Manual
Welcome
Welcome to Audio Memos and thank you for choosing this application.
We tried to make Audio Memos as intuitive as possible, but some part of the application may still require some explanations. Reading this manual will not only help you with general usage, but will also let you get the most out of this application.
This guide is divided in various sections:
- Playing - everything you need to know concerning playing audio memos. Learn how to select a memo, play its content, use position markers, change the playback speed, set alerts and more.
- Recording - recording audio using Audio Memos. Learn how to create a memo, the different ways to start recording, the extra information stored in a memo and more.
- Editing - ways to edit audio within Audio Memos. Learn how to insert audio, extract audio, compress audio, merge recordings and more.
- Sending - sending memos by email, to servers, to other applications, to iTunes, or to other Audio Memos users.
- Transcribing - sending memos for transcription and viewing the resulting text.
- Settings - the list of settings along with explanations about them.
- Transferring to a computer - transferring memos to a computer.
- Updating from free version - tips for users coming from the free version.
- Video tutorial - a video tutorial showing how to use Audio Memos.
- FAQ - the list of frequently asked questions, along with their answers.
Playing
To play a memo, select it in the list of memos. You might then want to use the position slider or use navigation buttons (along with position markers) to change the current playback position. You could also decide to change the playback speed or set an alert date for the memo.
The list of memos' screen
This is Audio Memos' main screen. In landscape mode, it is located on the left of your iPad's screen. In portrait mode, it is revealed by pressing the "Audio Memos" button located in the upper left corner of the screen. This screen is composed of various elements.
First comes the navigation bar.
 The plus button will let you create a new memo or import a memo. You can also notice an "Edit" / "Done" button. Pressing this button will toggle the editing - selecting mode for this screen. For more information on selecting memos, see the selecting section.
Then comes a search bar.
 If it is hidden, it can be revealed by scrolling up the list of memos. On the right of the search box is the filter button. Press it to filter the recordings by tags. Press the search box to activate the search mode. The search box will be placed on top of the screen to indicate that the search mode is active; to deactivate it, press the "Cancel" button.
 While in search mode, only some memos will be displayed: those whose name contain the text in the search box. You can also choose to search memos which match a certain criteria by using the selector bellow the search box:
 This will let you search respectively all memos, sent memos, unsent memos, due memos, and memos that are not due (a memo is due if it has an alert date in the past and if it has not been played or sent since that date). Note that by entering * in the search box and selecting a criteria, all memos matching that criteria will be shown.
The next element is the list of memos. Every memo is represented by a cell containing its name, its stared status, its creation date, its length and its size.
 Note that the color surrounding the "i" on the right side of the cell has a meaning:
 Red indicates a memo that is due (that is, a memo with an alert date in the past and which has not been played or sent since that date).
 Green indicates a memos that has been sent (by email or to a server).
 Blue is the color displayed in all other cases.
 This will also display the detail screen for the memo.
Pressing the highlighted cell again will pause the current playback (or start playing again if playback was paused).
Note that you can display the detail screen without playing the memo by pressing the "i" on the right of the cell.
You can press the "i" on the right of the cell to display the detail screen for the associated memo.
This will also display the detail screen for the memo.
Pressing the highlighted cell again will pause the current playback (or start playing again if playback was paused).
Note that you can display the detail screen without playing the memo by pressing the "i" on the right of the cell.
You can press the "i" on the right of the cell to display the detail screen for the associated memo.
The last element is a toolbar.
If no audio is playing, the following toolbar is displayed:

 Its first button will bring up the settings screen.
The next one will create a new memo and start recording. The last one will show the info / help screen.
If audio is playing, the toolbar is the following one:
Its first button will bring up the settings screen.
The next one will create a new memo and start recording. The last one will show the info / help screen.
If audio is playing, the toolbar is the following one:
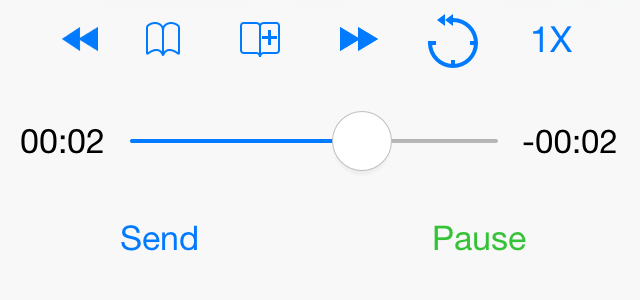 In the first row there are four buttons to use position markers (see the position markers section for more details on these) and two buttons to adjust the playback speed (see the playback speed section for more details). Under these buttons is the position slider. At the bottom you will find a send button (see the sending section for more details) and a play or pause button.
Selecting memos
While viewing the screen with the list of memos, press the "Edit" button to activate the selection mode. In this mode, the cells representing the memos have a selection indicator on the left. This represents an unselected memo:
 Pressing a cell will select it
 or unselect it.
The toolbar at the top of the screen changes once the selection mode is active.
 The first two buttons let you deselect all memos or select all memos. Note that if the search mode is active, the first button pressure will only deselect or select memos that match the search text (the second time the button is pressed, the deselection or selection will apply to all memos). The text in the toolbar will reflect the number of memos currently selected.
The toolbar at the bottom of the screen also changes.
 Then buttons are respectively the delete button, the merge button (see the merging memos section for more information), the send button (see the sending section for more information) and the copy / compress button (see the compressing audio section for more information). The action of these four buttons apply to all selected memos.
The position slider
The position slider indicates the current position inside the recording.
 The slider can be dragged to change the current position. The numbers on the left indicate the current position in the recording. The numbers on the right indicate the time left till the end of the recording, or (while recording) the total duration of the recording. Dragging your finger away from the slider will adjust the scrubbing position (the further away your finger is from the slider, the more precise you can be when adjusting the position). The green marks on the position slider represent the position markers (see the position markers section for more details).
Position markers and pictures
Position markers let you navigate easily within a recording. They also let you attach comments and pictures to a position in a recording. Buttons related to position markers are displayed whenever a memo is selected. Which button is displayed and active depends on the recording and editing statesstate.
There are various ways to create new markers:
- By pressing the
 button. After pressing this button, you can choose to add a description to the newly created marker by pressing the
 button. Note that this button appears for a few seconds each time a marker is created.
 - By pressing the
 button. After pressing this button, you will have to take a picture (if your device has a camera) or select a picture to associate with the newly created marker.
 - Some settings let you define events that will create position markers (like pressing the "Record" button).
The
 and
and
 buttons let you change the current position respectively to the previous or next marker.
To access the position of a specific marker, or to see the description or picture associated with markers, use the
 button. This will display the list of markers. Each marker is represented by a cell:
 Pressing the cell will change the current position to the position of the marker represented by the cell. Pressing the "i" on the right of the cell will let you view and edit the details about the related marker. To delete a marker, swipe your finger from right to left on its cell, then confirm by pressing the "Delete" button that appears.
Position markers and pictures can be exported and imported. Exporting is done by sending the recording when the "Send markers" setting is active. Note that markers can only be exported by email or to another device running Audio Memos. To import position markers, press the "Import" button located on top of the list of markers. This will show you a screen in which you can paste or type a text representing the markers. Each line represents a marker and should be formatted like "h:m:s Description" (e.g. "1:23:12 Question 12" will set a marker at 1 hour 23 minutes 12 seconds with the description "Question 12").
Playback speed
These two buttons let you adjust the playback speed and position. The first one will move the playback position backwards by 5 seconds. If you keep pressing it for a few seconds, the position will change by 10 seconds instead of five. Every press on the second button will change the playback speed to the next value in the list: x1, x2, x1/2 and the custom value of the Speed >> setting. If you keep the button pressed, the playback speed will change to the custom value specified in the settings; after a few seconds the playback speed will change to twice that value (until you stop pressing the button).
Alerts
An alert date can be assigned to a memo in order to remind you to listen to it or send it. On the alert date (and time), a visual reminder will be displayed. This will happen even if Audio Memos is not in the foreground. Once the alert date passes, the memo is said to be due. It will remain due until you listen to it or send it. The number of memos that are due is showed on the top right corner of Audio Memo's icon.
To set an alert date, go to the detail screen of a memo then press the "Date" or "Alert" field. This will show you the date and alert selection screen.
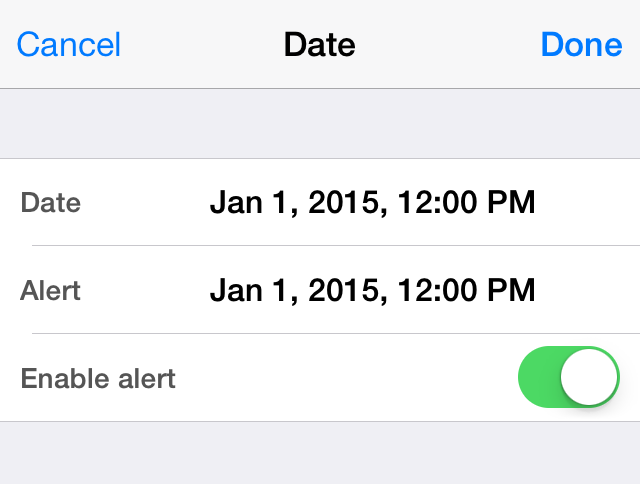 The top part of this screen contain these fields:
- Date - the creation date of the memo.
- Alert - the alert date at which you will be reminded of this memo. This field is hidden if the "Enable alert" switch is not active.
- Enable alert - this switch enables or disables the alert.
You can also use one of the preset alert dates.
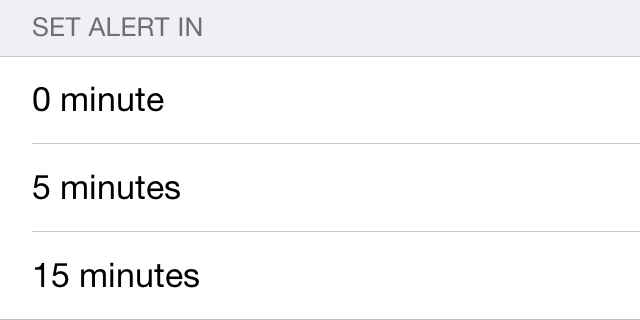 Pressing on one of these will change the alert date for the current memo and dismiss the date and alert screen. Selecting "0 minute" will flag the memo as due (without showing a visual reminder). You can choose to automatically assign an alert date to a memo using the default alert setting.
Tags
Tags can be added to your memos to classify them. Tags are usually made of one or two words. To add tags to a memo, press the related field on the detail screen. You can display all the memos which have a certain tag by pressing the  button located in the search bar on top of the list of memos.
Recording
Creating a new memo
There are three ways to create a new memo. The most obvious one is by pressing the "Record" button
on the screen with the list of memos (Audio Memos' main screen).
when the detail screen is grayed out.
 This will create a new memo with the default settings. It will also start recording right away.
The second way to create a memo is by pressing the
 button on
Audio Memo's main screen.
top of the detail screen.
This will let you adjust the Quality and Stereo setting of the new memo.
button on
Audio Memo's main screen.
top of the detail screen.
This will let you adjust the Quality and Stereo setting of the new memo.
The third way to create a memo is by activating the "Record on app startup" setting. Each time you enter Audio Memos, a new memo will be created (with the default settings) and recording will start.
The detail screen
This screen is the one presented to you while recording, or when pressing the "i" on the right of a cell in the list of memos. It is composed of various elements.
First, there is the navigation bar. It will be red while recording is taking place,
 otherwise it will be black.
 You can also notice an "Edit" / "Done" button on it. Pressing this button will toggle the editing mode for this screen. You need to be in editing mode to record audio. A "Cancel" button is also sometimes present, it lets you delete a newly created memo.
The "Audio Memos" button will bring you back toshow you the screen with the list of memos.
You can also notice an "Edit" / "Done" button on it. Pressing this button will toggle the editing mode for this screen. You need to be in editing mode to record audio. A "Cancel" button is also sometimes present, it lets you delete a newly created memo.
The "Audio Memos" button will bring you back toshow you the screen with the list of memos.
Then comes the name of the memo and its stared status.
 While in editing mode, you can press this cell to edit its content. Some special character sequences will be replaced when you finish editing the name (see the default name section in the settings for more details). Note that recent names can be reused.
The next elements give information about the recording. Some fields can be edited, others not.

- Date - the creation time and date of the memo (can be edited). It is hidden if the alert field is visible.
- Alert - the time and date when an alert will appear to remind you of this memo (can be edited). This field is only visible if an alert date has been set for this memo and if this date either is in the future or has passed but the memo has not been played or sent since then.
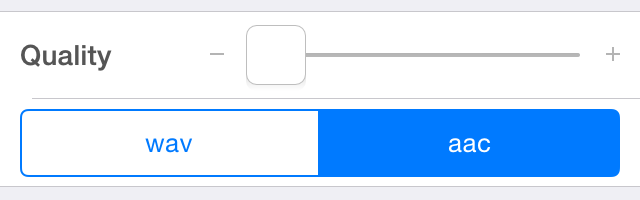
- Quality - the quality of the recording. There are three possible levels, corresponding to 11kHz, 22kHz and 44.1kHz (can only be edited when creating a new memo).
- Stereo - indicates if the recording is in stereo (can only be edited when creating a new memo, and will only be taken in account if a compatible stereo input is connected to your device).
- Format - the encoding format of the recording (see the editing section to know how to change the format of a memo).
- Transcription - indicates if the memo has a transcription. Press on this field to see the text of the transcription and to request a transcription.
- Sent - indicates if the memo has been sent. When a memo is sent (by email or to a server) the value of this element is set to Yes / On. You can edit this field.
While editing, the recording activation selector and sometimes a gain slider can be seen.
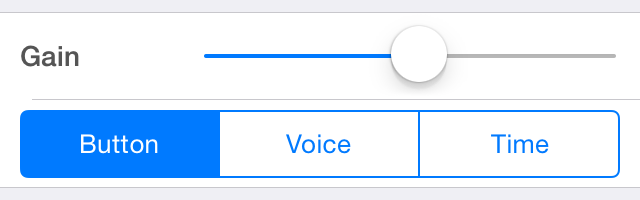
The gain slider lets you specify the input gain to apply while recording. We recommend you lower this value if the volume meter is moving in the red region. Changes made to this parameter affects the audio data. For best results, only adjust this parameter when starting a new recording. Note that only some input sources allow you to adjust their gain. If the current input source does not support variable input gain, the gain slider will not be visible.
The recording activation selector defines the behavior of the red button on the bottom of the screen and the way recording starts and stops.
- Button - pressing the red "Record" button will start or stop the recording.
- Voice - pressing the red button will activate or deactivate the listening mode (also known as voice activation mode). While in listening mode, recording will start when the sound level is higher than the Threshold value and will stop when the sound level stays under the Threshold value for a fixed time. The time the sound level can stay under the Threshold value without stopping the recording can be adjusted using the Decay slider. Note you can experiment the effects of the Threshold and Decay sliders before recording by observing the color of the Threshold slider (it turns from yellow to red to indicate recording should be taking place).
- Time - pressing the red button will activate or deactivate the timer. When the timer reaches zero, recording will start (if it was stopped) or stop (if recording was taking place). You can also specify a starting and a stopping date and time that will initialize the timer. Note that Audio Memos has to stay visible on the screen of your device when using a timer to start recording.
The toolbar is different in editing mode and normal mode. While in normal mode it shows these buttons.

 There is a button for deleting the recording, four buttons to use position markers (see the position markers section for more details on these) and a button to extract and compress audio (see the extracting audio section).
Two buttons also let you change the playback speed (see the playback speed section for more details). While recording, it shows these buttons.
While in editing mode, it shows these buttons.
Note that the navigation buttons are deactivated while recording.
There is a button for deleting the recording, four buttons to use position markers (see the position markers section for more details on these) and a button to extract and compress audio (see the extracting audio section).
Two buttons also let you change the playback speed (see the playback speed section for more details). While recording, it shows these buttons.
While in editing mode, it shows these buttons.
Note that the navigation buttons are deactivated while recording.
 Apart from the standard position markers buttons, there is a camera button which lets you add a picture to a memo (see the position markers section for more details on this).
Then comes the position slider
or the volume meter while recording.
 The position slider gives the current position in the recording (see the position slider section for more details). Note that the current position is used when recording starts: you will be given the choice of inserting audio at the current position, or overwriting audio starting at the current position. The volume meter shows the volume of the audio being recorded.
The last elements on the screen are buttons.

 Note that the order of the buttons can be changed using the "Invert Record-Play" setting. Which buttons are displayed depends on the editing state, the recording/playing state and the presence of audio data. You will find these buttons:
- Play - play the recording starting at the current position.
- Pause - pause the playback of the current recording.
- Record - start recording (if the detail screen is grayed out, this will also create a new memo).
- Start Listening - activate the listening mode.
- Stop Listening - deactivate the listening mode.
- Start Timer - start the timer.
- Stop Timer - stop the timer.
- Send - send the memo (see the sending section for more details).
Recording behavior
Audio Memos will keep on recording while in the background. If recording should stop while in the background (typically because another application wants to play sounds) a message will be displayed.Note that phone calls cannot be recorded. Incoming calls will pause the recording for a few seconds (until you dismiss the call or until the call gets redirected to your voice mail). If you want to make sure your recording does not get interrupted, turn on the airplane mode in the Settings application. You should also make sure no alarm or alert is set to go off during recording, as these will also cause an interruption.
Editing
Deleting a memo
The easiest way to delete a memos is to swipe your finger from right to left on its cell in the list of memos, then press the "Delete" button to confirm.
 You can also press the
 delete button located in the toolbar on the detail screen. Finally, you can select multiple memos and delete them using the
delete button located in the toolbar.
delete button located in the toolbar on the detail screen. Finally, you can select multiple memos and delete them using the
delete button located in the toolbar.
The trash can
When a memo is deleted, it is placed in the trash can. Change the trash can setting if you want your memos to be removed from your
button on
Audio Memo's main screen,
top of the detail screen,
then select "Import from trash can". A new screen with a list of memos appears, simply select a memo to retrieve it from the trash can.
Memos in the trash can are removed from your
Inserting, appending, overwriting audio
To insert, append or overwrite audio in a memo, the detail screen of the memo has to be visible and editing mode has to be active. Use the position slider to reach the position where you want to insert or overwrite audio (or place the position slider at the end of the recording to append audio). Then press the "Record" button. A message will appear asking you what to do.
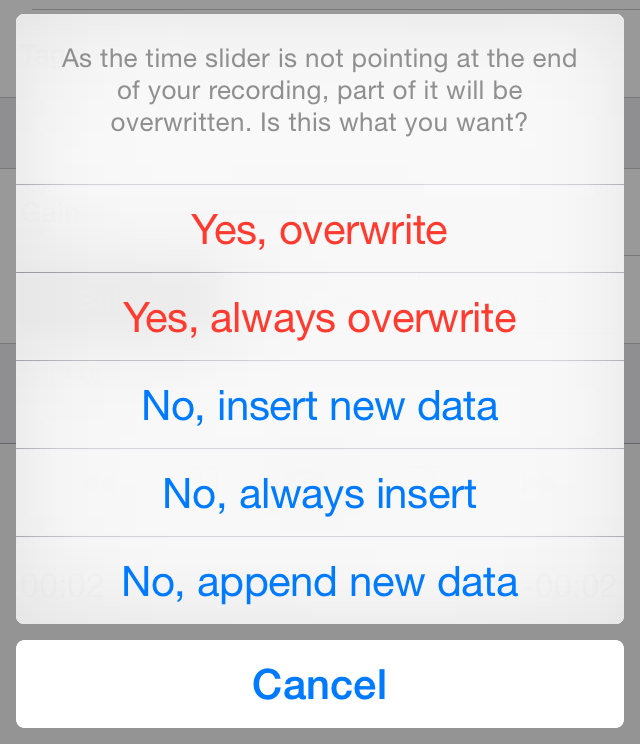 This message will not appear if
- the position slider is at the end of the recording (in this case, audio is added at the end of the existing recording),
- "Yes, always overwrite" or "No, always insert" has been previously selected. In this case, you can use the "Reset other settings" button in the settings screen to make the message reappear.
Extracting audio
A specific section can be extracted or removed from a recording, or an existing recording can be trimmed. To do so, go to the detail screen of the memo containing the recording and press the "Edit" button then the
 extract button. A new screen will appear.
On top of this screen, is a slider representing the part of the recording currently selected.
 Move
Move
 to change the starting position of the selection and move
 to change the ending position. You can also press on the current selection to move both the beginning and the ending positions. Dragging your finger away from the slider will adjust the scrubbing position (the further away your finger is from the slider, the more precise you can be when adjusting positions). Anytime a finger is pressed on the current selection, a popup will appear indicating the beginning and ending times of the selection. Use the play button to listen to the selected audio.
Right bellow the selection slider are navigation buttons.
 Select whether to move the beginning or ending position, then press the
 or
or
 button to move to the previous or next position marker.
Then you have a picker with two options: "Extract" and "Exclude".
 When "Extract" is selected, the current selection will be kept and the rest will be trimmed. When "Exclude" is selected, the current selection will be removed and the rest of the recording will be kept.
Next comes a quality and a format selector.
 Note that selecting a quality higher than the one of the original recording (which is the one set by default) will not improve the quality of the extracted audio.
The length of the selected audio is always displayed, as well as an estimation of the disk size required to save it using the current quality and format parameters.
After adjusting the parameters on this screen, press the "Done" button to apply the changes. You can then choose to replace the recording of the current memo (using the "Replace" button) or create a new memo (using the "Create copy" button).
Merging memos
The recordings of various memos can be merged to create a new memo. Note that the recordings being merged are not altered by this process.
First select the memos to merge. Then press the
 merge button. This will bring up the merge screen.
On top of the screen is the navigation bar.
 The "Cancel" button will hide the merge screen without merging the memos. The "Merge" button will hide the screen and merge the memos.
Then comes a list of memos. Every memo is represented by a cell.
 To change the position of a memo in the list, press the right part of its cell and drag it up or down the list.
On the left of the cell is a button to remove the memo from the list of memos. Then comes the name of the memo and the slider representing the audio currently selected.
Move
to change the starting position of the selected audio and move
to change the ending position. You can also press on the current audio selection to move both the beginning and the ending positions. Dragging your finger away from the slider will adjust the scrubbing position (the further away your finger is from the slider, the more precise you can be when adjusting positions). Anytime a finger is pressed on the current audio selection, a popup will appear indicating the beginning and ending times of the selection. Pressing on a cell will select it.
To change the position of a memo in the list, press the right part of its cell and drag it up or down the list.
On the left of the cell is a button to remove the memo from the list of memos. Then comes the name of the memo and the slider representing the audio currently selected.
Move
to change the starting position of the selected audio and move
to change the ending position. You can also press on the current audio selection to move both the beginning and the ending positions. Dragging your finger away from the slider will adjust the scrubbing position (the further away your finger is from the slider, the more precise you can be when adjusting positions). Anytime a finger is pressed on the current audio selection, a popup will appear indicating the beginning and ending times of the selection. Pressing on a cell will select it.
 Once selected, you can use the navigation buttons in the toolbar at the bottom of the screen to change the current audio selection (using position markers). After being selected, a position slider will come over the audio selection slider. This slider is used when using the play or the split button in the toolbar at the bottom of the screen.
The last cell in the list is an "Add" cell.
 Pressing it will let you add a memo to the list.
At the bottom of the screen is a toolbar.
 It contains various buttons.
- Use the play button to preview the merge result. Playback will start at the currently selected memo, at the position indicated by the position slider.
- The split button will split the currently selected memo into two parts, using the position indicated by the position slider as a splitting point.
- Then comes the duplication button, which will duplicated the currently selected memo.
- The next element lets you select the beginning or ending position indicator.
- The last two elements let you move the beginning or ending position (according to the selected indicator) of the audio selection of the currently selected memo using position markers.
Compressing and copying memos
There are various ways to compress or copy memos. The first way is by selecting the memo(s) and pressing the  button. The second way is by using the extracting screen with the whole recording selected (this method will only let you compress or copy one recording at a time). Both methods will bring you to a screen where the quality and the format of the resulting memo(s) can be adjusted (see the explanations about the extracting screen for details). A third way to compress memos, is by activating the "Auto compress" setting.
Importing memos
Memos can be imported in Audio Memos in a variety of ways:
- Using the "Open in..." feature of other applications on your
iPhone . The Mail application, for example, has such a feature. - Transferring the memos using iTunes. See the USB transfers section for details.
- Sending memos over WiFi between two different devices running Audio Memos (this method also allows you to send memos from a computer to Audio Memos).
- Copying some content from your Music Library. To do this, press the
button on
Audio Memo's main screen,
top of the detail screen,
then select "Import from Music". Note that some files, like mp3 files, cannot be imported.
- Pasting the content of the clipboard. Audio content copied to the clipboard, for example from other applications, can be pasted in Audio Memos.
Sending
The send screen
This is the screen presented after pressing the "Send" button on the detail screen, or after pressing the send button when selecting memos in the list of memos, or when changing the "Auto send" setting. In the first two cases, a list of memos to send is associated with the send screen.
The navigation bar on top of the screen has up to two buttons.
 The left one will let you go back to the previous screen. The right one will let you toggle the editing mode.
The selection bar
 lets you select the type of destination. By default, the type you used last will be selected. The following sections will describe how to use a specific type. When selecting "More", you will be able to send memos to another application, to iTunes or to create a shortcut for the memo on the home screen of your
Sending emails
When the send selection bar is on "Email", a "To" and "Subject" fields are displayed.
 Pressing on one of these will let you edit it. Note that filling up these fields is optional; they will be used to prefill the email composition screen. When editing the "To" field, recently used email addresses can be selected. When editing the "Subject" field, recent subjects are visible. Note that occurrences of $n will be replaced by the name of the memo being sent (if more than one memo is being sent, $n will be replaced by the name of the first memo).
A password field is also available. For security reasons, there is no list of recently used passwords. When a password is set, the audio file will be sent as an encrypted zip file. The type of encryption used depends on the "Higher data protection" setting. If the setting is disabled, traditional zip encryption will be used. Otherwise AES 256 will be used; this offers a much better protection but is usually not supported by the unzip app installed by default on modern operating systems (you will need to install a specific unzip app to decrypt the file - a free app like "7 Zip").
If editing the "Auto send" setting, pressing the "Email" button will select email as the auto send destination (and the content of the "To", "Subject" and "Password" fields will be saved). Otherwise, the email composition screen appears.
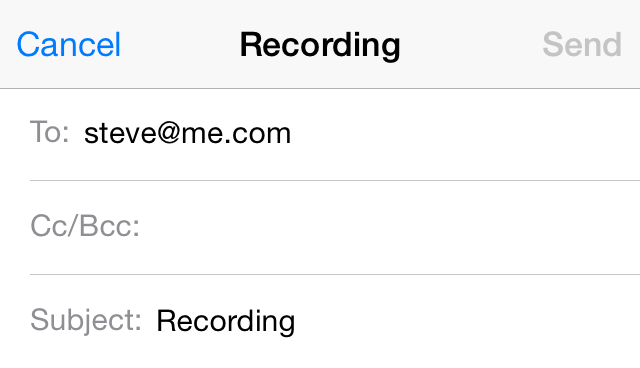 As mentioned above, the "To" and "Subject" fields will be prefilled. When you are finished composing the email, press the "Send" button to send it.
Note that the maximal email attachment size is 15MB.
Sending to a server
When the send selection bar is on "Server", a list of configured servers is displayed. An "Edit" / "Done" button is also displayed in the navigation bar. Note that if you only want to transfer memos to your computer, you might want to read the section about transferring memos to a computer, which describes the easiest way of transferring memos locally. Also note that you will need to have an existing account on a server, Audio Memos does not provide one for you.
When not in editing mode, pressing on a server cell will send the memo(s) associated to the send screen to the related server (or save your selection if you are changing the "Auto send" setting). The network activity indicator
 in the status bar will be visible during the transfer. Do not exit Audio Memos while this indicator is visible, otherwise the transfer will be interrupted. If an error occurs during the transfer, a message will be displayed. If the transfer is successful, no message will be displayed, but the "Sent" indicator for the sent memo(s) will be set. You can check the progress of a transfer in the Progresses screen (which can be found by pressing the "i" shaped button on the "List of memos" screen, scrolling to the bottom of the screen and then pressing on "Progresses").
In editing mode, a possible list of servers would be
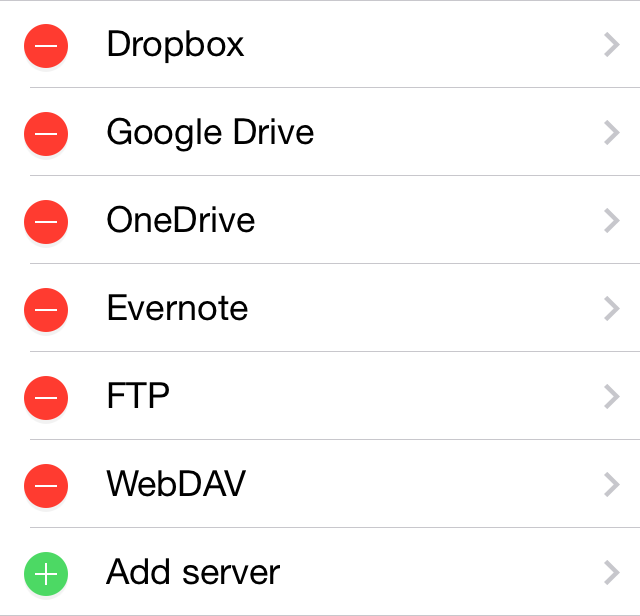 Pressing on a server's cell will let you edit the related server. An "Add" cell is also present. Pressing it will let you create a new server configuration. Pressing the "-" button on the left of a server cell will delete the server it represents.
When editing a server configuration, various elements have to be set in order for it to be usable. First comes the name or description for the server configuration.
 This can be set to anything you like. Next comes the server type.

 In addition to well known services like Dropbox, Evernote, Google Drive and OneDrive, Audio Memos also supports FTP, SFTP and WebDAV servers (note that FTPS servers are not currently supported). Depending on the selected type of server, different fields will be visible.
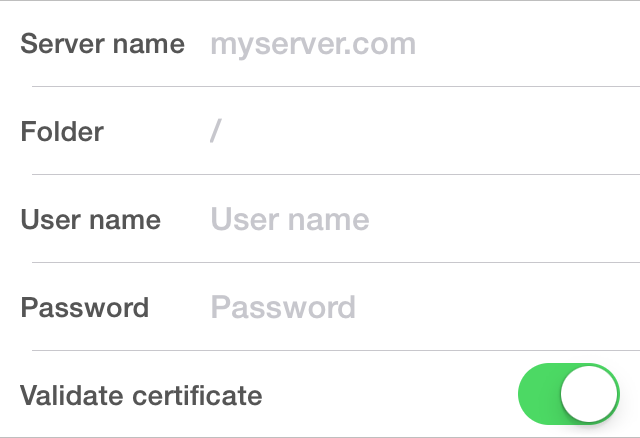
- Server name - the IP address or DNS name of the server (for FTP and WebDAV servers only).
- Folder - the folder on the server in which the memo(s) should be sent (will not be shown for Evernote servers).
- Notebook - the Evernote notebook in which the memo(s) should be sent (will only be shown for Evernote servers).
- User name - your user name on the server (this is often your email address).
- Password - the password used for authentication (for FTP and WebDAV servers only).
- Validate certificate - if you are using a secure connection, this lets you decide if the identity of the server should be checked using a certificate. If the server does not provide a certificate recognized by iOS, set this to OFF (will only be shown for WebDAV servers).
- Mode - which mode to use to transfer files (will only be shown for FTP servers).
- File name encoding - which text encoding to use for file names (will only be shown for FTP servers).
- Link / unlink account - link or unlink an account (will not be shown for FTP or WabDAV servers). Make sure to link your account to let Audio Memos send memos to it.
Sending to Audio Memos
When two devices running Audio Memos are connected to the same WiFi network, memos can be sent directly from one device to the other. Shortcuts to surrounding devices are shown under the list of configured servers (visible when the send selection bar is on "Server"). Note that other devices may appear on the list (any WebDAV server which publishes its service over Bonjour will be displayed). Pressing on a shortcut to a device will send the memo(s) associated with the send screen to the corresponding device. Devices for which a user name and a password are required will be added to the list of configured servers.
Note that you can also send audio files to Audio Memos using USB transfers, or using the "Open in" feature found in other applications.
Technical note: Audio Memos runs a WebDAV server which can be accessed using the Finder (on a Mac), the Explorer (on Windows), or any WebDAV client software; connecting to this server will let you download and upload memos to Audio Memos.
Sending to another application
When the send selection bar is on "More", press on "App" to reveal a list of applications that accept audio files. Simply select an application in the list to send the memo associated with the send screen to it. Note that not all applications on your device can accept files (if the application to which you want to send a memo is not present in the list, you might want to contact the developers of that application to ask them to add support for this feature). Note that the "App" cell will only be visible if sending a single memo (and is not available when changing the "Auto send" setting).
It is also possible to copy the audio contained in a memo to the clipboard. Another application can then read the content of the clipboard to import audio. To copy audio to the clipboard make a long press on the name of a memo in the list of memos and press the "Copy" button that appears. If the "Copy" button does not appear, you are probably trying to copy a too big memo (you should not try to copy memos over 30MB).
Sending to iTunes
in the status bar is visible. For more details on transferring memos with iTunes, see the USB transfers section. Note that "iTunes" is not available when changing the "Auto send" setting or if the "Use iCloud" setting is deactivated (in this case your memos will appear automatically in iTunes).Creating shortcuts on the home screen
When the send selection bar is on "More", press on "Add to home screen" to create a shortcut of the memo on the home screen of your
Note that you will need an active internet connection in order to create the shortcut. Also note that "Add to home screen" is not available if more than one memo is associated with the send screen (and will not appear when changing the "Auto send" setting).
Transcribing
Audio Memos can convert recorded speech to text. You can send existing memos to a transcription service. It is also possible to transcribe memos as they are being recorded.
The transcription result screen.
This is the screen presented after pressing the "Transcription" button on the detail screen of a memo. It displays the text associated with the memo.
The displayed text can be modified freely. Spelling and transcription errors can be corrected and will be saved along with the memo. It is also possible to copy the whole text and paste it in another app.
Under the space dedicated to the text, is a toolbar. By default it shows two buttons.
![]() The first button will let you delete the current text. The second one is used to request a transcription. While a memo is being transcribed, the toolbar changes to display a "Cancel" button and a progress indicator.
The first button will let you delete the current text. The second one is used to request a transcription. While a memo is being transcribed, the toolbar changes to display a "Cancel" button and a progress indicator.
![]()
Request a transcription.
After pressing the "Transcribe" button on the transcription result screen, you are presented with the transcription request screen. This screen has two sections. The first one displays information about the memo: its name and length.
![]() The second one displays information about the type of transcription being requested: the audio language and the estimated time it will take for the transcription to be performed.
The second one displays information about the type of transcription being requested: the audio language and the estimated time it will take for the transcription to be performed.
![]() Audio Memos tries to guess the language used in the audio recording, but make sure the selected language is correct (otherwise the transcription will fail). It is not possible to transcribe multiple languages at the same time. Once you correctly setup the transcription request, press the "Transcribe" button to confirm the request and send the memo for transcription.
Audio Memos tries to guess the language used in the audio recording, but make sure the selected language is correct (otherwise the transcription will fail). It is not possible to transcribe multiple languages at the same time. Once you correctly setup the transcription request, press the "Transcribe" button to confirm the request and send the memo for transcription.
Note that if you request a new transcription, the text currently associated with the memo will be lost. However, if the transcription is requested from the transcription result screen and that screen is visible when the transcription process ends, you can choose to save the new transcription text or keep the old one.
While the memo is being transcribed, a progress indicator is visible on the transcription result screen. One will also be shown in the cell of the memo in the list of memos. Note that Audio Memos has to stay visible on the screen of your device while the memo is being transcribed (so you cannot switch apps or turn off the screen). Once the transcription is finished, go to the transcription result screen to read it.
If the transcription text does not change after the transcription process finishes, an error probably occurred. Currently, transcription errors are only displayed if the transcription result screen is visible when the error occurs. We recommend to stay on that screen during the transcription process.
Note that currently only one transcription process can be active at a time. This means that you need to wait until a memos finishes transcribing before starting to transcribe another one.
Transcribe while recording.
It is possible to automatically transcribe memos as they are being recorded by enabling the "Auto transcribe" setting. Once enabled, every new memo will be transcribed as it is being recorded. Audio Memos has to stay visible on the screen of your device during the whole recording process. Recording can happen while Audio Memos is in the background, but transcription is currently only possible while Audio Memos is the active app.
Note that if another memo is being transcribed when recording starts, the new memo will not be transcribed automatically. It will have to be manually transcribed after recording stops and after the ongoing transcription is finished.
Privacy.
In order to transcribe a recording, audio is sometimes sent to a remote transcription service. This is done over a secure connection. The service uses your recording to create a transcription, as well as to improve the accuracy of the transcription service. More details are available on this web page.
Settings
The settings screen can be accessed by pressing the button on the screen with the list of memos. The available settings are grouped into categories.
Audio
- Amplification - the volume boost to apply during playback. This boost adds to the volume boost of a memo (see the amplification field explanation for more details) and to the playback volume (that can be adjusted using the volume keys on your
iPhone ). - Auto normalize - if active, the volume boost of a memo will be used during playback (see the amplification field explanation for more details).
- Audio filters - when active, the audio signal is modified during recording and playback to compensate shortcomings in the hardware. Unless you intend to process the audio signal yourself using another app, you should leave this setting enabled.
- Use only internal hardware - specifies whether to output audio through the
iPhone 's internal speaker (and to record audio from the internal microphone), regardless of any connected audio accessory (like a headset, a dock, or other). - Vibrate when recording - if active, your iPhone will vibrate when recording starts.
- Record sound from other apps - when active, Audio Memos will record sounds made by other applications (instead of stopping the recording session). Note that when this setting is active, the "Controls in Control Center" setting is ignored and you will not be able to use the buttons in the Control Center or on external accessories to control Audio Memos.
- Speed >> - the playback speed associated to the fast forward button. The green marker indicates the position of a normal playback speed.
- At end of memo - specifies what to do when playback reaches the end of a memo. Possible choices are: stop, repeat and play next memo. The "Play next memo" option will only work while the list of memos is visible.The "Play next memo" option will not work if you are editing a memo.
New recording default settings
- Name - the default name for new memos. The following character sequences get replaced when found in a name:
- $y gives the current year with four digits (),
- $yy gives the current year with two digits (),
- $M gives the current month (11),
- $MMM gives the current month with 3 letters (Nov),
- $MMMM gives the current month name (November),
- $d gives the current day (21),
- $E gives the current short day name (Sun),
- $EEEE gives the current day name (Sunday),
- $h gives the current hour, 12 hours type (05),
- $H gives the current hour, 24 hours type (17),
- $a gives the am/pm indicator (PM),
- $m gives the current minute (30),
- $s gives the current second (43).
- $n gives the current number of memos created inside the application (this number can be reset using "Reset other settings").
- $N gives the number of memos created today inside the application (this number can be reset using "Reset other settings").
- $c gives the title of the current event in your calendar (in case of multiple events, the event starting the later is chosen; if there are still multiple events, the shortest one is chosen).
- Alert - the default alert date assigned to a new memo when exiting the editing mode on the detail screen.
- Stereo - if active (and if a stereo input is available), new recordings will be done in stereo.
- Quality - the quality of new recordings. There are three possible levels, corresponding to 11kHz, 22kHz and 44.1kHz.
- Activation - the position to which the activation selector is set when entering the editing mode on the detail screen.
- Auto compress - if active, newly created memos will be in a compressed audio format.
- Auto send to - this lets you specify a recipient to whom new memos will be automatically sent. Note that it will be sent when exiting the editing mode on the detail screen (modifying an existing memo will not resend it). If you choose to auto send to an email address, the email composition screen will appear before sending (with prefilled fields for the recipient and subject).
- Auto split - lets you specify the maximal duration of new memos. While recording, a new memo will be created automatically once this limit is reached.
- Transcription - if active, newly created memos will be transcribed while recording is taking place. The language of the audio to transcribe can be set here.
Markers and Pictures
- Set when touching Record - if active, a marker will be added every time recording starts.
- Set when inserting - if active, a marker will be added at the beginning and at the end of inserted audio.
- Send markers - if active, position markers and pictures will be sent along the recording.
- Default description - the default description for new position markers. Some character sequences get replaced when found in the default description (see the default name setting for details).
- Delete all markers and pictures - delete all markers and all pictures for all memos.
- Search for lost pictures - will show pictures not associated with a memo.
Display
- Sort recordings by - specifies if memos should be sorted by name or by date when displayed in the list of memos.
- Show tips - if active, usage tips will appear when Audio Memos starts.
- Controls in Control Center - activates or deactivates the multimedia control buttons in the Control Center of your
iPhone (available by swiping up from the bottom of the screen). This will also activate or deactivate the controls found on external accessories. . Note that when the "Record sound from other apps" or "Higher data protection" setting is active, the value of this setting will be ignored and you will not be able to use the buttons in the Control Center or on external accessories to control Audio Memos. - Invert Record-Play - inverts the position of the buttons at the bottom of the detail screen.
File server
- Enabled - activate this to allow wireless file transfers between your
iPhone and other devices. For security reasons, you might want to deactivate this setting to prevent access to youriPhone (especially if you did not set a password). - Require password - activate this to protect the access to your files from a remote device. If you plan to use this application while your
iPhone is connected to a public WiFi network, it is highly recommended you activate this setting. - User name - if the "Require password" setting is active, this is the user name that will have to be given when accessing this
iPhone from a remote device. - Password - if the "Require password" setting is active, this is the password that will have to be given when accessing this
iPhone from a remote device.
Application
- Lock code - if set, this code will be asked every time the application becomes active.
- iCloud
- Use iCloud - lets you specify if Audio Memos should use iCloud or not. When this setting is ON, all recordings are stored in iCloud (if some recordings where on your
iPhone when you activate this setting they will be moved to iCloud). If you deactivate this setting, you will have the option to move your recordings back to youriPhone or to leave them in iCloud (in this case you will not be able to access them from thisiPhone ). - Email all iCloud memos - will create an email with links to all the memos stored in iCloud (this is usable even if the "Use iCloud" setting is deactivated). The creation of this email will take about one second per memo you have in iCloud.
- Stop loading memos - when a memo is being downloaded, a spinner appears next to its name in the list of memos. Pressing on this button will hide these.
- Sync memos now - forces Audio Memos to check if some memos in iCloud are not listed in the app.
- Cleanup the list of memos - removes duplicates from the list of memos, as well as memos corresponding to hidden files (these could have been added by some older version of the app).
- Use iCloud - lets you specify if Audio Memos should use iCloud or not. When this setting is ON, all recordings are stored in iCloud (if some recordings where on your
- Record on app startup - if active, every time the application is started a new memo will be created and recording will start.
- Higher data protection - if active, your memos cannot be read while your device is locked with a passcode (except for the memo currently playing). Note that when this setting is active, the "Controls in Control Center" setting is partly ignored and you will not always be able to use the buttons in the Control Center or on external accessories to control Audio Memos. This setting also influences the type of encryption used when sending by email (AES 256 when the setting is active, traditional zip encryption otherwise).
- Add record icon to home screen - will add an icon to the home screen of your
iPhone ; pressing this icon will launch Audio Memos and start recording automatically. - Delete memo when sent - if set, memos will be automatically deleted once they are succefully sent.
- Use trash can - if active, deleted memos will be sent to the trash can before being removed from your device.
- Usage feedback - if active, usage feedback will be sent back to us. The information we receive will be used anonymously to help us improve the application.
- Reset due memos - recalculate the number on the badge on Audio Memos' icon to show number of due memos.
- Reset other settings - reset preferences set outside the setting screen (like the always overwrite / insert settings).
- Version - the current version of the application.
Transferring to a computer
This section describes how to transfer memos to (and from) a nearby computer. To transfer memos to a remote server, see the sending to a server section.USB Transfers
If you're using macOS Catalina or later:
- On your computer, open a Finder window.
- Connect your
iPhone to your computer using a USB cable. - Select your
iPhone in the left part of the Finder window. - Click the Files tab.
- Click the triangle next to "Audio Memos".
- Drag and drop files on and from the list under "Audio Memos".
If you're using macOS Mojave or earlier or a Windows PC:
- On you computer, open the iTunes application.
- Connect your
iPhone to your computer using a USB cable. - If the page for your
iPhone does not open automatically, check the buttons located on the top of the screen. In the latest version of iTunes, the button to select your device is the last one on the left under the playback controls.
On older versions of iTunes, look under the search box. If you see a "Library" button, press it. Then, if you see a "Devices" button, press it then choose youriPhone in the list that appears.
On even older version of iTunes, these buttons will not appear. Instead select youriPhone in the "Device" list displayed on the left. - Select "File Sharing" in the left sidebar. If you do not see it (you are using an older version of iTunes), select the "Apps" tab and scroll to the bottom of the page (there are two lists of app on that page, make sure to scroll to the second one).
- Select Audio Memos in the "Apps" list located in the "File Sharing" section.
- You can now use the "Add" and "Save to" buttons to transfer files over USB.
- Alternatively you can drag and drop files on and from the "Documents" list.
Visit this page on Apple's web site if you need more information: https://support.apple.com/kb/ HT4094.
If the "Use iCloud" setting is active in Audio Memos, you first need to select the memos you want to transfer in the list of memos and send them to iTunes. Also note, if you transfer memos to Audio Memos using iTunes, you then need to import them from inside the application (they will not appear automatically in the list of memos like when "Use iCloud" is disabled). To import a memo, press the
button on
Audio Memo's main screen,
top of the detail screen,
then select "Import from iTunes".
WiFi Transfers
On your computer, open a web browser and go to the following address:
 press its price,
 press "Buy now",
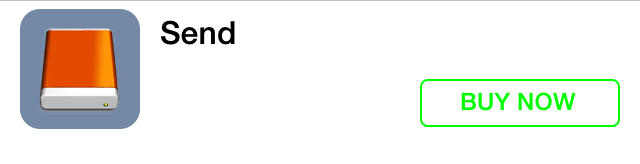 then enter your Apple ID credentials (if needed) and confirm your purchase.
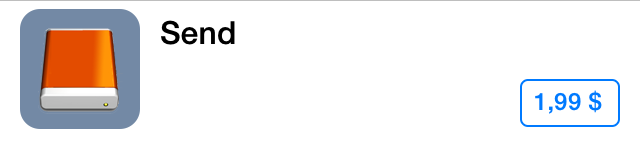
Updating from free version
Now you bought the paid version, you have two applications on your device: one for the free and one for the paid version. Each application is independent, and no memo has been lost in the process. However, memos are not transferred automatically from the free version to the paid version.
To transfer all memos from the free version to the paid version:
- open Audio Memos SE,
- press the "i" button under the list of memos,
- press the "Export all memos" button,
- press "App",
- select Audio Memos as the application to which you want to send the memos,
- wait while the memos are being copied, the paid version will open automatically when the memos are copied.
You can also manually transfer single memos by following this procedure:
- open Audio Memos SE,
- go to the detail screen for the memo you want to transfer,
- press the "Send" button,
- press "App",
- finally select Audio Memos as the application to which you want to send the memo (this will open the paid version automatically).
You can also use WiFi transfers to transfer your memos from the free version to a computer.
Video tutorial
Note that you need an internet connection to view this video. This video can also be viewed in the YouTube application.
FAQ
Here is the list of frequently asked questions. Press on a question to reveal its answer. Note that the list is loaded from our server.